What is the lifespan of a motorcycle chain? At one point or another, you've probably asked yourself this question. While nothing lasts forever, with proper maintenance and high quality parts, there's a good chance your chain and sprockets will last you over 30 km. Since the chain is one of the most essential parts of your motorcycle, it is wise to make a habit of checking it regularly. It only takes a minute or two, and it can make all the difference when it comes to keeping your motorcycle safe on the road. In this article, you will understand how to see if a motorcycle chain is worn? And how to replace it?
Motorcycle chains - General information
On the market, there are a whole bunch of motorcycle chains that meet specific needs. So, before you get started, we advise you to take a look at our complete guide on the subject.
Get down to work
If you need to know when to replace your motorcycle's chain, most of the time, it's just a quick glance. Stand at eye level with the chain for the best possible view and check carefully for signs of wear. It is not unlikely that you will be able to spot greasy dirt or a slight build-up of rust on the chain. Although it should be addressed immediately, it is not necessarily a cause of total chain replacement. A simple cleaning and lubrication should fix the problem easily.
You may need to replace the chain if you see more serious signs. Is the chain so rusty that it cannot be repaired? Does she have difficulty maintaining proper blood pressure? Are the sprockets worn unevenly or are the sprocket teeth bent? All of these can indicate that it is time to replace the motorcycle chain.
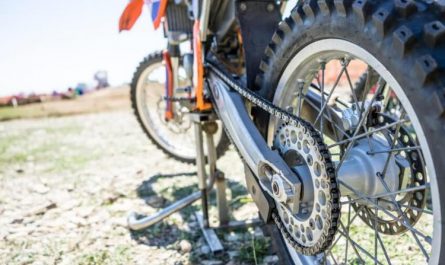
Check the sprocket teeth of your worn motorcycle chain
To see if a motorcycle chain is worn, start by examining the sprocket teeth. Teeth should be straight, not curved or arched. Curved sprocket teeth indicate that the sprocket is worn. If you are not sure whether the sprocket teeth are bent or not; keep a new sprocket handy for comparison. The difference between a new sprocket and a damaged old sprocket is evident when the two are held side by side.
Sprocket Teeth Available on Amazon
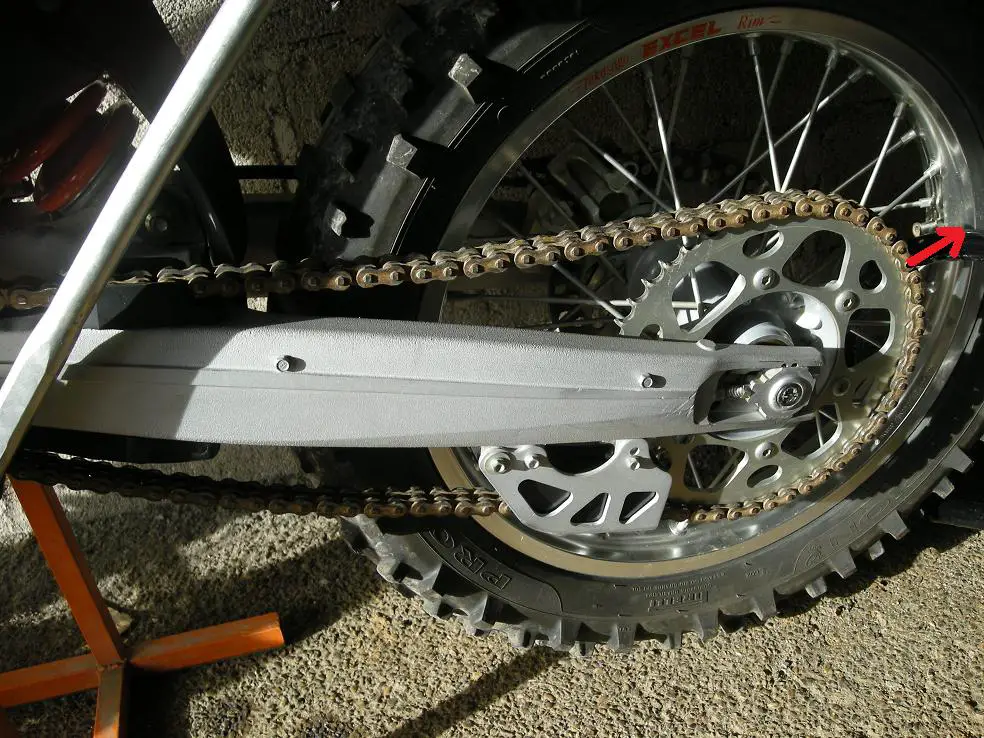
Another test to perform is to check the chain tension
Once the tension is properly adjusted, pinch the chain near the rear end of the rear drive sprocket and begin to slowly withdraw it from the sprocket teeth. You should pull the chain back from the 3 o'clock position, keeping it parallel to the ground. A good chain should hardly move, and no chain should move enough to expose more than half a tooth. Any chain that allows significant movement when pulled is not good.
How to replace your worn motorcycle chain?
Now that you know the ins and outs of checking your motorcycle's chain and sprockets, what do you do if you find that they need to be replaced? Understanding how to replace a motorcycle chain is an important part of motorcycle maintenance and an always useful skill to have. Fortunately, this is an inexpensive project that you should be able to complete in a day or less.
A worn motorcycle sprocket can quickly degrade a new chain, and a worn chain can damage a new sprocket. That is why we always recommend replacing the chain and sprockets with a set. The first step is to access the gables. Place the motorcycle on a paddock stand or motorcycle jack to ensure its stability while you work and allow you to possibly remove the rear wheel.
Remove the worn motorcycle chain
Remove the front sprocket cover. On some motorcycles, this may require removing the gear lever. You should then see a large front socket nut. The nut may have a washer which locks with tabs. If so, gently bend the tabs back using a screwdriver to release the nut from the washer. Before applying elbow grease to remove the front nut; place a solid object in the rear wheel to stabilize it as you apply force. Then loosen the front nut using an iron bar. Note that you need to loosen it, but leave it in place for now.
Once the rear wheel is out, undo the sprocket nuts to remove the old sprocket and install a new one on the wheel. Now that you've removed the rear wheel, you can go back to the front sprocket and replace it as well. Be careful not to fully tighten both sprockets yet. Some mechanics also like to clean the area around the gears before installing the new ones; so feel free to use WD40 as you go.
Install the new channel
Wrap the old chain around the new front sprocket, then start to reinstall new channel, loosening the chain adjuster if necessary. Once the old chain is mounted on the new sprockets, use a chain separator tool to break off the old chain and attach it to the new one. Pull the old chain out of the front sprocket until the new chain is fully seated on both motorcycle sprockets. Finally, after all of the old chain has come out, you can attach the new chain using a riveting tool.
If you don't have a chain splitter or riveting tool, you can also remove the old chain before replacing the sprockets and insert the new chain directly after. With the new sprockets in place, guide the new chain starting at the rear sprocket and making a circular motion toward the front sprocket, then back.
Finalize the installation of the chain
Regardless of how you lay the chain and sprockets, it is important to add the finishing touches by replacing the washers, firmly tightening the sprocket nuts to the correct torque, adjusting the chain tension and replacing the sprocket covers. When the job is finished, check your job again using the test method described earlier. The new, firm chain should hardly move away from the sprocket teeth.
Screwdrivers available on Amazon
Our recommended products for shortening a motorcycle chain:
To conclude, here are some recommended products on Amazon: